Wednesday, June 26, 2013

Pinterest Challenge : BBQ Cauliflower Bites

I found this pretty yummy looking recipe on Pinterest and I thought that it looked really great! Chicken wings are a family favourite here and a healthy alternative to that would be amazing! These BBQ Cauliflower Bites were said to taste just like chicken wings but made from a vegetable. That sounded too good to be true!
and it was...

Here is the recipe I followed.
1/2 Head of Cauliflower cut into 1 inch strips about 2 inches long
1 Cup of Flour
1 Cup of Non Dairy Milk (I used baby rice cereal as a substitute)
1 Teaspoon of Garlic Powder
1 Teaspoon of Onion Powder
1/2 Teaspoon of Paprika
1/2 Teaspoon of Brown Sugar
1/2 Teaspoon of Liquid Smoke (optional so I did not use it)
1 Cup of BBQ Sauce (I used spicy hot wing sauce)

1. Preheat oven to 450f.
2.  Mix all dry ingredients together then dip the cauliflower into it making sure to cover it everywhere.
3. Place on a non stick cookie sheet or one sprayed with PAM.
4. Bake for 15 minutes. Meanwhile, heat the BBQ sauce in a pot.
5. Dunk each piece of cauliflower into the sauce then bake another 5 minutes.


Click here to go to the blog with the original post.


I don't think that I will make this again. Honestly, it was bar-b-q covered cauliflower.

Who knows, maybe I did not do it right for some reason but the directions were followed as they were written.

Give it a try if you like this kind of flavour. Maybe it would be a good side to steak? It was not horrible, but it was not too good either....

If you try to give this recipe a go, let us know how your results turned out. Hopefully better than mine!


By Mommy Melissa

 photo 3mommiessig_zps86cc38de.jpg

Sunday, June 23, 2013

Unique Gifts for Tots

So today I came across the cutest little toy website called Acorn, they have all handcrafted toys, one of a kind! These gifts are perfect for baby showers, birthday's, Holiday's- really anytime you want to get that little one something really special! I invite you all to visit the website and check it out :)

Here are my favorite picks:

1. Crescent Moon Music Box * 2. Waldorf Pocket Gnomes * 3. Cat Rattle * 4. Maileg Friendly Fox 
5. Blue Wooden Sailboat * 6.Speedster · Red  * 7. Wooden Cat Set

POST BY MOMMY OLIVIA


Thursday, June 20, 2013

Vegetable Enchiladas


This delicious recipe I grabbed from dear old Martha Stewart... let me tell you, she is definitely a whiz in the kitchen.  I would have never thought in a million years that enchiladas with no meat would actually taste good, right? BUT I was so WRONG! They are amazing! and very good for you. This recipe will definitely be a keeper in my household. 

What you will need: 
2 tablespoons olive oil, plus more for baking dishes
2 teaspoons ground cumin
1/4 cup all-purpose flour (spooned and leveled)
1/4 cup tomato paste
1 can (14 1/2 ounces) reduced-sodium vegetable broth (or chicken broth is desired)
Coarse salt and ground pepper
3 cups grated pepper Jack cheese(or cheddar)
1 can (15 ounces) black beans, rinsed and drained
1 box (10 ounces) frozen chopped spinach, thawed and squeezed dry
1 can of corn drained
6 scallions, thinly sliced, white and green parts separated
12 corn tortillas

The Sauce: 
In a medium saucepan, heat oil over medium. Add 1 teaspoon cumin, flour, and tomato paste; cook, whisking, 1 minute. Whisk in broth and 3/4 cup water; bring to a boil. Reduce to a simmer, and cook until slightly thickened, 5 to 8 minutes. Season with salt and pepper, and set aside.

The filling:
In a large bowl, combine 2 cups cheese, beans, spinach, corn, scallions, and remaining 1 teaspoon cumin; season with salt and pepper. Mix Well!


 Let's put it together:
Preheat oven to 400 degrees. Lightly oil two 8-inch square baking dishes; set aside. Stack tortillas, and wrap in damp paper towels; microwave on high for 1 minute. Or stack and wrap in aluminum foil, and heat in oven for 5 to 10 minutes. Top each tortilla with a heaping 1/3 cup of filling; roll up tightly and arrange, seam side down, in prepared baking dishes. (Use toothpicks to keep closed if needed)

  
Top It:
Dividing evenly, sprinkle enchiladas with remaining 1 cup cheese, and top with sauce (use it all!). Bake, uncovered, until hot and melty, 15 to 20 minutes.


 Original recipe HERE

mmmmmmmmmmmmmmmm, ahmazing!

POST BY MOMMY OLIVIA


Pinterest Challenge: Spicy Tortilla Soup


This is one of my favourite recipes and one of the first recipes from Pinterest I've tried. I am a huge soup fan and this tortilla soup has got to be the best soup I've ever made... (and I make some damn good soups) Tons of flavour in every bite, goes perfect just as a meal alone! You MUST try this soup! You can find the original recipe here.

What you will need: 
2 tablespoons ground cumin

2 teaspoons sweet paprika

2 teaspoons chili powder

1/2 teaspoon garlic powder

1/2 teaspoon onion powder

1/2 teaspoon dried oregano

1 teaspoon coriander
1 1/2 teaspoons salt
1/2 teaspoon black pepper
3 tablespoons light colored oil
1 large onion, diced
1 green bell pepper, diced
1 red bell pepper, diced
3 cloves garlic, minced
1 (4 ounce) can diced mild green chiles, drained
1 can of Diced Tomatoes with Lime & Cilantro 

1 (15 ounce) can whole kernel corn, drained
2 (32 ounce) containers Swanson Organic Vegetable Broth (or chicken broth will do)

2 (15 ounce) cans black beans, drained and rinsed
Juice of 1/2 a lime

1. In a small bowl mix together cumin, sweet paprika, chili powder, garlic powder, onion powder, oregano, coriander, salt and black pepper. Set aside.

2. In a large pot heat the oil over medium high. Add the onions and bell peppers. Sauté until soft, stirring occasionally. Add the spices and garlic; cook for 2 minutes.

3. Add the green chile peppers, diced tomatoes, corn and vegetable broth. Cook until warmed through. Add the black beans and cook for 2 minutes before serving. Squeeze in lime juice. Serve in bowls and garnish as desired.

Topping suggestions: Tortillas, avocado, shredded cheese (this is a must, it gets all gooey and delicious with every bite!)

Let us know how this recipe turned out for you!

POST BY MOMMY OLIVIA

Tuesday, June 18, 2013

At Home Fries Supreme!


This is a recipe I created a few years back when I was living with my sister in her old apartment. Its a take on Taco Bells Fries Supreme. Making it at home lets you control what goes into it and the quality of the products used. Its very simple to make and quick too. I took some short cuts and used frozen fries but if you have the time to make them yourself, all the power to ya!


You will need:
1 bag frozen french fries
1 lb lean ground beef
1 pack taco seasoning
toppings of your choice.
diced tomatoes
shredded lettuce
onions (green onions would have been great)
shredded cheese
salsa
sour cream
salsa con queso cheese sauce
hot sauce

1. Cook fries as directed on the package.
2. Brown the ground beef, drain off excess fat, add the taco seasoning and follow the directions on pack.
3. Once the fries and beef are both cooked, then you assemble them to your liking. Use as little or as much of a topping as you would like. Its up to you!

What are some other toppings that you think would be tasty on these At Home Fries Supreme?

By Mommy Melissa

 photo 3mommiessig_zps86cc38de.jpg

Monday, June 17, 2013

Pinterest Challenge: Frosted Corn Flake Cereal Clusters aka Scotchies

A few weeks back, I received a box of amazingly tasty clusters. They were so crisp and peanut-buttery with full peanuts in them. My husband thought that it was fried chicken at first glance, then was sad when he found out there were not! Anyways, they were so good that I did some Pinterest searching for the recipe for them. I came across a few but this one was the most simple and all the ingredients were in my pantry all ready. What makes it even better? They are a No Bake cookie!
You can find the link to the recipe I followed here.

I ended up making a few changes along the way that I believe needed to be done without causing my teeth to fall out!

What you will need:
1 cup of butterscotch chips
1 cup of peanut butter
3-4 cups of corn flakes (original used 1 cup of frosted flakes)

What you do:
Melt butterscotch chips and peanut butter over low heat in a pot.
Mix cornflakes into pot and stir until it is all covered with the peanut butter mixture.
Spoon onto wax paper covered cookie sheet then chill in the fridge until firm. About 1 hour.

I cannot stress about how good these things are! Once you make them, you will make them over and over again they are that good. Adding some other extras would make them even better, like peanuts, mini marshmallows, chocolate chips, the possibilities are endless. James even made up his own name for them, 'cluster f**ks'! That man, I tell you!

Simple, Fast and Tasty!
By Mommy Melissa

 photo 3mommiessig_zps86cc38de.jpg

Sunday, June 16, 2013

Happy Father's Day!


We would like to wish all the wonderful dads, grandpas, papas, step-dads and everyone else who is a father, a Happy Father's Day! 

 photo 3mommiessig_zps86cc38de.jpg

Saturday, June 15, 2013

Baby Boo Bear Boutique - Wristlett Chewelry Review


Isn't it beautiful!? 
I as well have received a very exciting item in the mail a few days ago! My Wristlett Chewlery from Baby Boo Bear Boutique! I had been waiting for it after I found out that both Jenn and Olivia received theirs. When was mine going to come!? Well it came a few days ago and I have to say, wow! The very first thing I thought was how the colours were so bright and cheerful I love yellow and purple, and the flower design is very fun and lively. I then looked at how it was made and what it was made from. I know from Baby Boo Bear's page that the material is Rhapsody Lemon, Organic Cotton (super cute!) and that after each knot there is a bead made from unfinished natural wooden bead, covered with the organic cotton. The end ribbon is securely attached and very resilient. I pulled and pulled with not a budge! I tried it on and it fits very nice and it easy to wear.
As soon as Amelia had the wristlett in her hand, she threw it back at me and laughed her little bum off! She is in the trowing stage right now so I gave it back to her. Then it when right in her mouth. She is cutting a top tooth right now on the right side and that is where she had it. She chewed on it for a while which is surprising for me because she was never one who liked to chew on teethers! I think she liked the feeling of the hard bead with the soft fabric on top. She really also enjoys chewing on the ribbon. After she was done playing with it and off to go terrorize the cat, I picked it up and it was soaked in drool! She must have really liked it for her to have chewed that much on it! The chewlery was very easy to clean. I just hand washed it in the sink with dish soap, rinsed it very well, and hung it up to dry. 
Another use for it that I found was on Amelia's high chair there is a small hole where a toy clips onto it. I tied the ribbon to the hole and tied one of her small toys to it. This way she was still able to play with it and not keep throwing it off every two seconds!
Amelia lovin her chewlery!
Overall I am very pleased with the Chewlery Wristlett. Its very practical, well made and very safe for baby! Most of all, Amelia really enjoys it! A lot! I am thinking of buying a teether from the boutique soon!

Don't foget to keep updated here as the Baby Boo Bear and 3Mommies giveaway is still in the works so stay tuned!

Check out her Facebook page here https://www.facebook.com/babyboobearboutique 
And follow her on Twitter here @adventuresbabyb

 photo 3mommiessig_zps86cc38de.jpg

Friday, June 14, 2013

Skinny Raspberry Lemonade Cake


So I told Phil (my boyfriend) to go to my Pinterest and chose anyone of my dessert recipes for Father's Day and I will make it for you. So this is what he chose...

What you will need:
- 1 box white cake mix
- 3 tsp Pink Lemonade Flavored Crystal Light Drink Mix
- 6 tbsp of GREEK raspberry cranberry yoghurt
- 3 egg whites
- 1 cup water
- 1 8 ounce container Cool Whip Free

Preheat over to 350. Combine all ingredients with your mixer. Pour mixture in to 9x13 inch cake pan (greased and floured). Cook for 25-30 mins (until toothpick comes clean) Once cooled apply a generous amount of Cool Whip on a slice of cake.

NOTE: If you do not plan on eating the cake right away leave it without the Cool Whip and just apply when ready to eat. 


 Original recipe from HERE 

This cake turned out really delicious, you can really taste the lemonade- for a less strong taste add less drink mix or pour on the Cool Whip! 

Happy Fathers Day Weekend to all the Dad's out there!  

POST BY MOMMY OLIVIA


My Style Chicken Fried Rice


This is one of those dishes where you just throw everything your fridge to make one scrumptious meal. Chicken fried rice is a fav when eating takeout, so why not make it at home? I always make this when we had chicken leftovers the night before. I hope you enjoy it :) 

what you will need: 
- 1 cup of jasmin rice (or rice of your choice)
- 1-2 cups of cooked chopped chicken
- a couple handfuls of chopped fresh spinach
- 1 medium onion diced
- 2-3 tbsp soy sauce
- 3/4 cup chicken stalk
- 1 tsp oregano
- a dash of your favourite hot sauce
- 2 tbsp general tao sauce
- 2 tbsp honey garlic sauce(or hoison)

First cook your rice as per the directions on the bag- instead of using water use your chicken stalk, set aside. In a large pan saute onion and spinach until almost tender, add in chicken and oregano (salt and pepper to taste), saute a minute longer. Add in rest of ingredients (including rice) saute for a few minutes until all the flavors are combined, then enjoy! 

Variations: Really there could be many variations to this recipe, it's very flexible. Use any of your favourite Asian sauces- try combining all of them. They give such great flavour. One day I wanted to make this rice so bad but I had no chicken so I substitued for chickpeas instead (it was so good!) Give it a try, we'd love to hear your variations! :)

BY MOMMY OLIVIA


Cabbage 'Un'rolls

Cabbage rolls are a big hit in my house. The only thing is, with two kids and a baby, it's hard to find the time to prepare them. I was excited when I came across a recipe on facebook for what I have renamed "cabbage UNrolls". I tweaked the recipe, because I can't ever follow a recipe to the T, I just can't. The original recipe called for tomato sauce, of which I had none, and it left out the rice. Here's my version of the recipe.


1lb lean ground beef
1/2 a medium cabbage
1 medium onion, diced
2 cloves garlic, minced
1 lg can diced tomatoes
1/2 jar original ragu
1/2 small can of tomato paste
Salt and pepper
Garlic powder
2 cups minute rice, prepared according to box directions
 
In large frying pan, cook ground beef until almost brown. Add onions and garlic and cook until onions are translucent and meat is browned.
 
(At this point I transferred the meat/onion/garlic mixture to a pot, since I don't have a big enough frying pan. Obviously if you have one large enough, you won't need to)
 
To meat mixture, add the can of diced tomatoes, ragu, tomato paste, and cabbage. Season to taste with salt and pepper, and garlic powder. Bring to a boil, then cover, reduce heat and simmer, stirring occasionally for about 30 minutes or until cabbage is soft.
 
While everything is simmering, in a separate pot, prepare minute rice according to box directions. When your cabbage is as soft as you like, add rice to the big pot. Stir it up, and adjust seasonings if necessary.
 
How much easier is that? The entire time it was cooking the kids were coming in and out of the kitchen going "I can't wait for dinner, it smells SO good in here!". It made enough for all four of us to have seconds, plus a container for Mike to take to work today. I'll definitely be making this one again soon!


Thursday, June 13, 2013

The Best Meatball Soup You'll Ever Eat.

I. Love. Soup.

Seriously. I could eat it every day. I also love meatballs, but I'm not a huge pasta fan. What better than combining two of my favorite comfort foods into one?

 
Here's the recipe.
 
 
1lb lean ground beef
1 egg
Seasoned breadcrumbs
Dried parsley and oregano
A few cloves of garlic, however much you prefer
8 cups of beef broth
1/2 of a medium cabbage
3-4 large carrots
1 medium onion
2-3 stalks of celery
2 medium potatoes
3 tablespoons of tomato paste
Salt and pepper
Dried oregano and parsley
Garlic powder
Olive oil (or veggie oil, or whatever you use)
 
For the meatballs:
 
Combine ground beef, egg, seasonings (including salt and pepper), and garlic with enough breadcrumbs to hold it together. I don't have a measurement for this, I just gauge by the feel of the meat. Roll into 1" balls.
 
Heat oil in pan, add meatballs in batches, turning until browned. Remove meatballs and set to the side.
 
For the soup:
 
Combine beef broth, tomato paste, and seasonings in large pot. Bring to a boil, then simmer while you're getting the veggies ready.
 
Dice your carrots, celery, and onion. Wash your potatoes, and cut into chunks (leave the skin on!). Throw those in. Simmer for about 15-20 minutes.
 
Chop your cabbage into spoon size slices. In the pot it goes, along with the meatballs. Bring to a boil, then simmer for 10 minutes or so, until the cabbage is softened. Adjust seasonings to taste, and serve!
 
So simple, and so tasty. I could go for a nice big bowl of it right now!


Baby Boo Bear Boutique - Clippy Chew Review

A few days ago I received a clippy chew from Baby Boo Bear Boutique to review. I've been super excited to see it in my mailbox and even more excited for my little product tester, baby Jax, to try it out.

The first thing I did upon taking it out of the package (since Jax was sleeping) was visually inspect. The chewie I received consists of a natural birch wood ring for teething/chewing on, and a length of beads made of the same wood, with 100% organic cotton in a black and grey pattern knotted around them. At the opposite end of the fabric to the ring there is an alligator clip, and the clip and ring are attached with silver ribbon. The stitching and ribbon seem very durable, I did some serious tugging to test the strength and I feel certain that my little guy will never be able to rip it apart. I like the style of clip used, as the teeth are rubber, not metal, and the top part of the clip comes out further than the teeth, so it poses much less of a pinching hazard. Definitely a bonus when your kid grabs at everything within range.

Now for the real test, does Jax like it?

It predictably took a split second upon handing him the chewie for him to shove it in his mouth. The beads must feel amazing on gums, because he was chomping away contentedly. The wooden ring is just the right size for tiny little hands to hold on to, and once he noticed it and tried it out, he loved it too. It was pretty funny to watch, he wasn't too sure about it at first, and gave it a few little licks with a confused look on his face. He's never used a wooden teether before, I mainly give him frozen fruit in a mesh feeder or my finger, so I think the texture was strange to him. He got over that quickly though, and now whenever I have it clipped onto his shirt, he goes right for that ring. I have to say, it's a welcome break for my poor fingers! He doesn't seem to like squishy things to gnaw on, so the wood is perfect. I have so many different teethers, from vibrating teethers, to plain nubby rubber ones, to the world famous Sophie, and out of them all, this one has seen the most chew time from Jax. I think that alone says more than I ever could about how wonderful this product is, and how it's not necessary to spend big bucks on some questionable plastic thing.

Here are a few pictures of Jax and his chewie:


Head on over to her Facebook store and browse the selection of baby products. After such a great experience with the clippy chew I received, I'm planning on ordering a wristlet in the near future. Not only are the functional, they're super cute too!

A giveaway from Baby Boo Bear Boutique and 3 Mommies is in the works, stay tuned for more details!


Tuesday, June 11, 2013

Product Review: Baby Boo Bear Teether

Recently 3mommies was contacted by a great little boutique that designs Jewelry that your baby can chew! (and other unique homemade gifts) How great is that? I can't tell you how many times Noah has grabbed my necklace and started chewing on it. This is a great accessory for on the go, because guess what? It won't fall if it's attached to you (or the baby)! She also has a number of other products, such as teethers and burp clothes. These unique gifts are one of a kind and made from all organic materials, so that means not made with nasty chemicals you can't pronounce!

When I first gave Noah his teether he immediately licked it (of course) and then proceeded to chew. I think he likes the way it's made out of wood and not that chemical filled plastic all our teething rings are made of. I'm always so afraid of him punching a hole through them and him getting to the poison- I always kept a close watch with those, but I don't have to worry with this teether! This item is made from all natural birch wood, so I know he won't be ingesting anything toxic.

Check our her Facebook page HERE and take a gander for yourself.


We will be doing a giveaway soon of her lovely products so stay tuned!

POST BY MOMMY OLIVIA


Toddler Sensory and Learning

Recently Noah has learned an important skill that requires a great deal of patience and balance. After the big ordeal a few days ago I stopped by McDonald's to get Noah a Happy Meal. He actually received a useful toy. It was from the movie Epic, it had a ball and 2 scoops. The whole idea is to throw the ball from scoop to scoop. Noah learned how to balance ball in the scoop and walk with it, he concentrated so hard, then he experimented with other objects, such as a bigger ball, a little doll, and a block. He felt the difference in weight and he learned to balance and control his hands correspondingly.


All and all Noah is doing great, the burns are healing quickly, he's just a bit itchy. The nurse says he can have his bandages off soon, and he was able to have a real bath today which was nice. I hope everyone has a great week, it's my weekend! :)


POST BY MOMMY OLIVIA


Wednesday, June 5, 2013

That moment your heart stops

Recently a horrible thing happened to my baby that I could not control. 

A few days back I was at work, as always, I had just got off a call when my cell phone started to ring (I only have the ringer on for emergencies) when I glanced at the screen and saw it was "Home" calling I knew there was something wrong. I quietly answered my phone, when the a familiar voice was on the other end... not one I was expecting however. It was my youngest sister, her panicked voice uttered the words "Noah spilled boiling water over his body" my heart skipped a beat as I heard him crying hysterically in the background. "Is he OK? How did this happen?" I kept screaming over and over, the only words she could reply was he won't stop crying and he had grabbed my sisters fresh cup of tea of the dresser and poured it down his chest. I immediately asked if there was anyone else home (such as my mom or dad) but they had just left to bring my mother to therapy for her dislocated knee. Tears were rolling down my cheeks, was my baby OK? I was so far away from him (I work a 40mins away from home) there was nothing I could do. I called my mom, thankfully they were still in town, once I had told her what happened they quickly went back home.

I left work in a rush to take care of my baby, that was the longest drive of my life. 5 minutes before I got home my sister  called me to say and ambulance had taken him to the hospital- which was all the way back to where my work was- another 40 minutes drive. I felt like strangling her. All I kept thinking is that Noah was wondering where his mommy was and why wasn't she there to take care of him. I just heard his cries in my head. But again there was nothing I could do I was so far away, thankfully my dad was with him- but it's not the same! Once I got home my sister drove me back up to the hospital to see my baby.

We finally arrived, all I kept saying to myself was he's OK, he's OK. I told the receptionist my name and she guided me to the reccessetation room, why the hell was he there? Did something go horribly wrong? Was Noah OK?

I walked through the door I saw my baby, his chest completely red covered with blisters  and hooked up to a heart rate monitor. I started to cry, but I was told to be strong and to not upset Noah. He was calm and in good spirits considering. The nurse had explained what they had done to soothe his pain and stop the burning, she also told me that as long as I keep applying the ointment there would be no scaring. We would followup with a pediatrician the next day and a nurse would be coming the next 8 days to address his dressings. He was OK. I prayed to god that night to protect my baby forever.

I just want to say it's really hard to be far away from your children when something like this happens, big or small you always want them close by. Never underestimate an "on the go" toddler. Even when you think something is out of reach, if you have a climber it never really is. Noah is going to be fine, he's taking Tylenol for the pain and the cream is taking care of the burns. I wanted to share this story with you just in case you are in a similar situation. It's important to be strong for your child.

BY MOMMY OLIVIA.

Tuesday, June 4, 2013

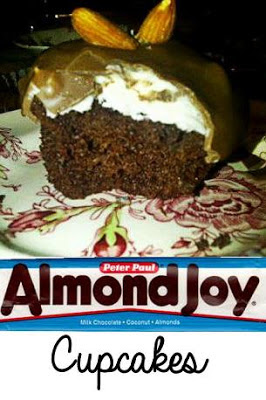
Pinterest Challenge: Almond Joy Cupcakes

 I have made quite a few recipes from Pinterest and as you all know from your own experience some come out as a complete flop, and others come out as a complete masterpiece... this one was definitely a complete masterpiece! It was so easy too! I thought i was going to be tricky and not turn out like the pictures at all, but I'm glad I took the risk. I made them for my Dad's birthday everyone loved them, and I brought the leftovers to my work everyone said they were the best cupcakes they've ever had. Don't believe me? Try for yourself!

This recipe came from Your Cup of Cake blog. 

What you will need: 

Cake Ingredients: 

1 box Devil's Food Cake Mix
4 eggs
2/3 cup oil
1 small pkg. chocolate instant pudding
1 cup milk
1/2 cup sour cream
2 teaspoons vanilla extract 
Coconut Topping:

3/4 cup butter, softened
8 oz cream cheese, softened
1 1/2 cups shredded coconut
1 teaspoon vanilla extract
3-4 cups powdered sugar 
You will also need: 
1/2 cup almonds (whole or sliced- your choice)
3-4 cups chocolate melts
Cupcakes: 
Preheat over to 350 degrees. In a large bowl blend together all wet ingredients, once thoroughly combined add in the cake mix and the instant pudding. Line your muffin tins with cupcake liners, fill 3/4 of the way. bake for about 20 mins or until toothpick comes clean. Let cool. 

Coconut Topping:
blend together all ingredients except the sugar and the coconut. Once smooth add in the coconut- mix again. Add in the icing sugar 1 cup at a time until it reaches a thick icing. 

Pile a generous amount of the coconut topping on each cupcake, then smooth down. Melt your chocolate until smooth, then dip each cupcake in the chocolate- top with a couple almonds. Let the chocolate harden, then enjoy! 


Click HERE for step  by step pictures from original recipe. 

POST BY MOMMY OLIVIA


Tide Pods, a Review


I purchased some Tide Pods awhile back and was pretty disappointed. I found that when I washed my clothes with them, they would sometimes get stuck in a garment and just stick to it in one spot like glue. It happened a few times, not just once. It never ruined the clothes, just made them very sticky and had to rewash them several times for the mess to come off. I never really noticed it until I would be folding the clothes and find one. After it had been dried it stuck even worse to the clothes.

Here is a picture of (my ever so beautiful nigh gown!) that the pod became glued to after a wash and dry
 I contacted Tide from their webpage and the customer service was great! They wrote me back right away giving me tips to have this not happen again. I could have been over stuffing the loads causing the pod to get wrapped tightly in a piece of clothing. I was also given a coupon in the mail to use towards a new purchase of the Tide Pods which was a bonus for sure!

The times (that were more than the bad ones) that it worked properly, the clothes smelled great and were very clean! They are so convenient to just toss into a load with no measuring liquid or powder, the neat little jug takes up less room than the large jugs or liquid detergent. And you have to admit, these little things look so darn cute!  I don't know about you but I just always want to squeeze them!!!

Have you tried them out yet? Have you had the same problem with them or a different one? Let us know, we would like to hear from you.
 photo 3mommiessig_zps86cc38de.jpg

Monday, June 3, 2013

Pineapple Dump Cake -by mommy melissa

This recipe was givin to me by my mom Debbie! Super tasty and very moist! Plus, clean up is easy as you mix it all in the pan!
 photo 3mommiessig_zps86cc38de.jpg