Thursday, October 31, 2013

HAPPY HALLOWEEN!

It's finally here! And I must say I have been snacking on junk all day long, and the day is only have way through! I can't wait until tonight to see Noah go trick-or-treating for the first time, last night I threw a little Halloween party for him- I'm pretty sure he had the time of his life. Here are just some pictures from our evening, the costumes were great!!!


Have a safe night everyone :)

POST BY MOMMY OLIVIA

 photo 3mommiessig_zps86cc38de.jpg


Thursday, October 24, 2013

Country Apple Dumpling - Pinterest Challenge


I am on an apple roll again! Here is a Pin that needs to be shared with everyone you know! This has come to be one of my favourite desserts. It is THAT good! Crisp and gooey all packed into a perfect little dumpling.

Here it is! Or check out the Pin I used here 
1 can crescent rolls
1 large peeled apple, cut into 8 wedges with the core removed
1/2 cup butter
1/2 cup sugar
1/2 tsp cinnamon
1 cup Sprite (or Mountain Dew)

1. Roll each apple slice in a crescent roll, starting at the smaller end. Be sure to close up the ends. Place in bake dish.
2. Melt the butter and sugar in a small pot. Add the cinnamon.
3. Pour the butter mixture over the apple dumplings covering them all over.
4. Pour the Sprite in. I sprinkled some extra cinnamon on top too.
5. Bake at 350 for 40 minutes or until golden brown and bubbly.
6. Serve as is or with some ice cream.

Start with the pointed end of the crescent roll.
Line 'em up in a baking dish.
Pour the butter mixture over top.
Pour in the Sprite (or Mountain Dew)


Bake them till they are golden masterpieces!

By Mommy Melissa

 photo 3mommiessig_zps86cc38de.jpg

Wednesday, October 23, 2013

Logan the Little Artist

My two year old son is an artist. His favourite medium to work with? Well that would have to be Sharpie markers and white walls! He even dabbled a bit with a gold marker on my counter top!
First of all I would like to say that I have no freaking idea where he found them! I keep them on my book shelf way out of reach. But one morning he hopped out of his crib and started his masterpiece!
After trying to wash it with a dish cloth and dish soap, nothing came off. I asked the great and powerful Google what to do. There were people with all different ideas from nail polish remove, disinfectant wipes, hand sanitizer, alcohol, acetone, and magic eraser.


Nail polish remover, nothing.
Disinfectant wipes, nothing.
Hand sanitizer, nothing.
At this point I was getting worried.
Alcohol, nothing.
Acetone, what the heck is that? Skipped that one!
Magic eraser. I had to go to the store to buy it because I did not have one! But am I glad I did! That thing worked wonders! Took it off no problem! The walls took a bit more effort but in the end it all came off.

Look its all gone!!


The power of the eraser!!

I am just so thankful to have gotten it off the walls! The moral of the story? I need to buy more magic eraser and keep my budding artist away from markers!!

Have your kids done anything like this? Tell us your story, we would love to hear it!

By Mommy Melissa

 photo 3mommiessig_zps86cc38de.jpg


Tuesday, October 22, 2013

Quinoa Cookies - Monthly Feature

Here is a monthly feature by the one and only Sarah S! She always has great recipes to share with us at 3 Mommies and Friends! Thank you Sarah for another great post! 


Ingredients: 
1 cup cooked quinoa, 
1 cup 100% rolled oats OR uncooked quinoa flakes, 
1 cup unsweetened shredded coconut, 
4 large bananas, 
1 tsp vanilla, 
1/2 cup coconut sugar, 
1/2 cup unsweetened chocolate chips (or raisins, walnuts, or any ingredient you want), 
pinch of sea salt
.
Directions: 
Pre heat oven to 375. 
In a large mixing bowling, mash bananas, add vanilla, coconut sugar, quinoa, oatmeal,coconut and a salt. 
Mix well until combined. Stir in chocolate chips (or whatever you're using). 
Line baking sheet with parchment paper and drop batter onto cooking sheet. 
Bake for 25-30 min, remove, let cool and enjoy! 

Switch up: add 1/4 cup cocoa powder to turn into double chocolate chip quinoa cookies.

I didn't put chocolate chips in them because I forgot, but I think it would have tasted amazing with them! Make sure you grease the sheet because I didn't and they stuck a lot haha. But anyways enjoy!!


Thank you again Sarah! They sure look tasty!

 photo 3mommiessig_zps86cc38de.jpg

Monday, October 21, 2013

Onion Soup Au Gratin


This is my all time comfort food. Especially on a cold day. Perfect paired with a light main dish or a stand alone light meal. It is filling and very flavourful. 

It may seem like this is a difficult soup to pull off, but it can be very simple. There are a few more traditional ways to make this soup but this one is super simple. 

You want your onions to look like this
Place bread on soup then cover with grated cheese


 Onion Soup Au Gratin

5 onions, sliced semi thin
3 cups of beef stock
1/4 tsp dried basil
1 bay leaf
pepper, to taste
enough crusty bread to cover the top of two bowls
about 1 cup of mozzarella cheese, more or less

1. Bring the beef stock to a boil. Add onions, basil, bay leaf and pepper.
2. Simmer until onions are soft.
3. Ladle into onion soup bowls. Add bread to the top then cover with cheese. Sprinkle with a bit extra basil.
4. Broil until cheese is bubbly and golden.
*Be careful the handles are very hot!

Hope you try this out and love it!

By Mommy Melissa

 photo 3mommiessig_zps86cc38de.jpg

Sunday, October 20, 2013

Last Halloween

Since last year was Amelia's first and Logan's second Halloween, we only went to the shopping mall where they hand out candies at the shops to the children. Along with my nieces, Annabelle and Madison, as well as my nephew Jaxson, we had a good time. Our children were too young for candy, so mommy and daddy got to eat it!

Here are the children all decked out in their Halloween attire!


By Mommy Melissa

 photo 3mommiessig_zps86cc38de.jpg

Saturday, October 19, 2013

How to Cook Spaghetti Squash


Here at home we like to eat spaghetti squash quite often. It took me awhile for James to talk me into trying it for the first time. How can a squash taste like pasta? Surprisingly, it does! Here are a few ways to cook it. I usually do mine in the microwave but I've done it in the oven as well. 

Microwave 

Pierce the squash all over then nuke it for around 10-15 minutes. 
Then leave it in the microwave for another 5. 
Take it out the cut it in half, width wise, not top to bottom you will get longer strands this way.
Scrape out the seeds and guts. 

Use a fork to scrape all the "noodles" out. 
Serve with sauce or what ever you like.

Oven  

Preheat to 375f. 
Cut squash in half. I cut it length wise as it sits in a pan better this way. 
Scrape out the seeds and guts.
Lay cut side down on bake dish.
Bake for 35-40 minutes. 

Let it rest about 5 minutes then scrape the strings out with a fork. 
Serve with what ever you like.

By Mommy Melissa


 photo 3mommiessig_zps86cc38de.jpg

Friday, October 18, 2013

Baked Acorn Squash


This is a perfect time of year for squash recipes. They are in season now and sold at low prices at the supermarket. This recipe uses an acorn squash, also known as a pepper squash. When you are handling squash and root vegetables, just remember to be careful! Pumpkins and butternut squash are on the list of top vegetables people cut themselves while trying to prepare them. Since acorn squash are in that same family, just take precaution. To see the complete list, click here.

This is a wonderful sweet and savory side dish perfect served with a roast pork and a spinach salad. 

Here is what you do.

1 acorn squash
2 tsp brown sugar
1 tsp butter (I didn't use it)


Preheat oven to 375.
Cut squash in half and remove the seeds and guts.  Fibrous strands and seeds if you want to get technical!
Place cut side down on baking dish.Bake for 40-45 minutes.Flip over and add brown sugar and butter (if using).Place under broiler until sugar is caramelized, around 5 minutes. Serve it like that or scoop out. *If you don't use the butter, there is less than 2 grams of fat in half the entire squash.

Since its the time of the squash, which ones do you like to cook with?

By Mommy Melissa

 photo 3mommiessig_zps86cc38de.jpg

Pinterest Challenge - Slow Cooker Apple Crisp


After going apple picking a few weeks back, I am still looking for ideas to use my never ending crisper drawer full of apples. Since baking is quite stressful with the kids pulling at me, breaking things, spilling things, fighting, etc. I loved the idea of just throwing everything into a crock-pot and letting that do the work for me! I substituted pumpkin pie spice for the nutmeg in hopes that it would give it more of a fall taste.
After about an hour of it cooking, my home smelled wonderful! Like fresh apple pies had been baking in my house all day!
Here is how it is done. 
(full recipe at bottom)
You prepare a flour/oat mixture as well as an apple/sugar mix.

Apples go in, then flour mix, then butter on top.
Bake for 3-4 hours on high.

There are a few things that I would change the next time I make this. One being to not use my little slow cooker. The crisp part on top ended up being too thick. Using the larger slow cooker would thin it out, giving it a better crisp. The other would be to lower the cooking time to about 2-3 hours. Other than those minor things, it tasted wonderful! This was a Pin Win! 

Here is the full recipe (or click here to go to the original pin)

6 cups of apples. Peeled, cored and sliced
1/2 cup sugar
1 tbs cinnamon
1/2 tsp nutmeg (I used pumpkin pie spice)
1 1/4 cup flour
1 cup oats
1 cup brown sugar
1/2 cup chopped pecans or walnut pieces (I had none)
1 stick of butter, sliced.

1. Grease your slow cooker.
2. Mix apples with sugar and spices. Put into crock pot.
3. In another bowl, combine the flour, oats brown sugar and nuts if you are using them. Pour onto apples.
4. Place the slices of butter on top of the flour and oat mixture.
5. Cook on high for 3-4 hours. Remove lid for the last 15-20 minutes to let the top crisp.

What is your best fall recipe to use apples in? We would love to hear. 

By Mommy Melissa 

 photo 3mommiessig_zps86cc38de.jpg

Thursday, October 17, 2013

Candy Corn Quesadillas

 photo c15debb4-6331-4244-b76f-fbd1778c2302.jpg

I saw this idea on Pinterest HERE when I was trying to look for a fun Halloween themed dinner. These turned out great and they were delicious!

What you will need:
1 rotisserie chicken, cut up
1 jar (16 ounces) salsa
1 cup frozen corn, thawed
1/4 cup barbecue sauce
1/2 teaspoon ground cumin
1/2 cup butter, melted
8 flour tortillas (10 inches)
1 jar (15-1/2 ounces) salsa con queso dip, warmed
4 cups (16 ounces) shredded Mexican cheese blend
2-2/3 cups crushed nacho-flavored tortilla chips
1/2 cup sour cream

1, In a pot, combine the first five ingredients; heat through, stirring occasionally. Brush butter over one side of each tortilla. 

2. Place one tortilla in a large skillet, buttered side down. Spread with 1 cup chicken mixture; top with another tortilla, buttered side up. Cook over medium heat 1-2 minutes or until bottom is lightly browned. Turn quesadilla.

3. Spread 1/2 cup queso dip over quesadilla; carefully sprinkle cheese along outer edge. Cook, covered, 1-2 minutes or until cheese begins to melt.

4. Remove to a cutting board. Sprinkle crushed chips over queso dip. Cut quesadilla into six wedges. Place a small dollop of sour cream at the point of each wedge. Repeat with remaining ingredients. Yield: 2 dozen.

YUM!

What are some of your favourite Halloween dinner ideas?

 photo 3mommiessig_zps86cc38de.jpg

Wednesday, October 16, 2013

Candy Corn Cupcakes

 photo 4cb0138b-94d3-42c0-9b01-444808f4d324.jpg

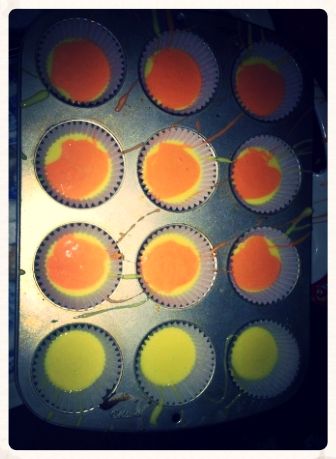
This recipe idea came from Pinterest of course. But it's so easy to do. You can either use a store bought cake mix or homemade... whichever you choose just make sure it's white cake mix!

What you will need:
- White cake batter (store bought or homemade)
- orange and yellow food colouring

 photo 182fff0d-3cf5-4df9-b5ed-6fd34a1bdf7f.jpg

Make the batter from the directions on the box, once done separate into 2 bowls, add orange food colouring to one and bright yellow to the other. Now you want to make sure your colors stand out so make sure there nice and bright- may need a couple extra drops of colouring!

Line your cupcake tins with cupcake liners, then first add a scoop of the yellow batter, then plop the orange on top of it, fill about half way or 3/4. then bake with the directions on the box, once you take a bite it will look just like a candy corn! Be sure to use white icing to complete the look :)

Definitely a crowd pleaser, perfect for Halloween!!!


 photo 01108d7d-bac4-4667-91f3-cb5cef4d56e3.jpg

 photo 3mommiessig_zps86cc38de.jpg

Friday, October 11, 2013

A Fall Nature Walk

With all the beautiful sunny warm days we've been having lately, I decided to take advantage of the warm fall days with a little nature walk with my little man. We went to this beautiful park with lots of greenery, we even saw some deer! Noah was fascinated as we walked along collecting leaves. Here's some pictures of us soaking up the sun!!!

 photo 33983d4d-3141-4693-b7a8-c39651c13857.jpg

 photo c9969ab1-5880-467c-a0ff-abe7c62bca6b.jpg

 photo 01b58e5d-05ef-4b55-993d-b2458b659473.jpg

 photo b44c42d5-6c42-43c9-b08e-298bf747172b.jpg

 photo cd8fa44d-e3cf-4c5d-b8fc-e51109a6b9c6.jpg

 photo 0c6d9ae6-f47c-4e72-8886-ae62947702b3.jpg
 
What have you been doing to get into the fall spirit?
 
POST BY MOMMY OLIVIA
 
 photo 3mommiessig_zps86cc38de.jpg