Showing posts with label Family Fun. Show all posts

Saturday, October 25, 2014

Toddler Toys That Get Played With

If you are like me, then your kids play room (or bedroom, living room, bathroom, kitchen) are all filled with random stray toys that just show up. The kids play with them for a few minutes (if that) then toss them and find something else to destroy play with .

I really did not realize how many toys these children of mine have until we moved into our new house. Boxes of them! Everywhere! Now the playroom is more of a hording room of toys strewn about than a room they actually play in!

Over the last years there are a few toys that stand out with my kids. Always enjoyed when played with and actually play with them over and over again.


Play Dough
I love to hate this stuff. My kids play and play with it and want to almost every day but me on the other hand, I cannot stand the feeling of it on my hands. I do not know anyone else who thinks that their hands feel gross while playing with it. 
The kids enjoy playing with mini dinos in it. Stamping the little feet into the dough and making foot prints. Cookie cutters are also a fun way we like to play. Rolling the dough is Logan's favourite part a while cutting shapes is Amelia's. I like to make play dough for the kids sometime just to mix it up a little. A super easy way is just to mix lotion with flour. It makes a pizza dough type dough that is stretchy.


Hot Wheels and Toy Trucks
I think you can never have enough Hot Wheels cars! They are so fun for the kids to play with in so many ways. A few things that we have done with them are car washes in the sink, ramps and slides made from cardboard and books, tunnels with toilet paper and paper towel rolls, parking garage with a box and markers, races to see which car goes father. So many ways, its incredible. You just have to use your imagination and the ways are endless.


Mega Blocks
Oh how Logan loves to build his towers! And oh how Amelia likes to knock them down. Logan could play for a long time with these. My husband has joked that since he loves them so much, maybe he will become an architect! That would be great! Making tunnels with these blocks and driving cars in them is also quite fun for the kids.


Dinosaurs
This my just be because of me and my love of dinos but my kids love to play with them. Its is also an educational game for the kids. Even if you do not know your dinos you can teach them about how some ate meat as carnivores and some here herbivores who only ate plants and trees. Logan loves the stegosaurus and his big 'pates' (plates) that were used as armor. Amelia is a raptor fan who likes to make it bite the other dinosaurs... a little scared there but proud she knows hes a meat eater!!


Pretend Play Kitchen Items.
Making soups and serving tea is also a fun activity for the kids. Pretend food, plastic plates, cutlery, and tea set can let them learn skills for later in life. As well as let them learn the love of cooking at an early age. Amelia received a Minnie Mouse tea set from Aunt Jules for her birthday this year, which she absolutely adores! She sets it all up and serves tea to us all as well as her stuffed bunny! 


Wooden Train Set 
This is one toy that is a Logan only toy. Amelia doesn't care much for playing trains. Logan loves building tracks all around his room and chugging his trains along them. The bridge is his most favourite part! This can be an expensive toy to buy new. Thankfully, I struck gold at a garage sale this summer where I picked up an entire full piece for only $4!


The Kitchen Sink
This is something that my kids LOVE to do. Fill up the kitchen sink with water and soap and play with anything they can put in there. Cups, spoons, plastic toys, bowls, bath toys, pretty much anything. Pouring water is apparently the most wonderful thing to do. I on the other hand enjoy how much they love it but I do not like having to clean up the spilled ocean of water on the counter and floor as well as the fight from telling them its no longer time to play in the sink.


Honorable Mentions

Stuffed Animals.
Many parents that I know do not like when their kids receive stuffed animals as gifts because they pile up in no time flat! I know that we have so many too but my kids have a certain few that they sleep with every night and a few more that are played with quite often.


Baby Dolls.
I let BOTH my kids play with baby dolls. I think it is fine for a boy as much as a girl to play with them. It promotes nurturing and love. There is no reason a boy should not be allowed to play daddy!


Ninja Turtles.
Another item here that has probably been installed in them by mommy and daddys love for ninja turtles! The kids love playing with them alone as well as with mommy and daddy. Especially in the turtle van from the 1980s


Does your child have a favourite toy that I have listed here? Why do they like to play with it?

What other toys are replay value with your children? Let us know in the comments!


By Mommy Melissa

Wednesday, August 13, 2014

Personal Pan Pizza with Easy No-Yeast Dough


Having two toddlers and a husband who always want to have pizza for every and any meal of the day,
I needed to make a recipe that was easy to fast and super simple to prepare.
I came up with this idea using a similar dough recipe from a cook book plus changed a few things to
make it how I wanted it to come out.
After two attempts, the recipe works great!
The dough is versatile enough to be used with different spices to give it your own personal touch.

Complete recipe is at the bottom.

This is all you need to make this pizza dough! 
Flour, baking powder, salt, warm water, and olive oil.
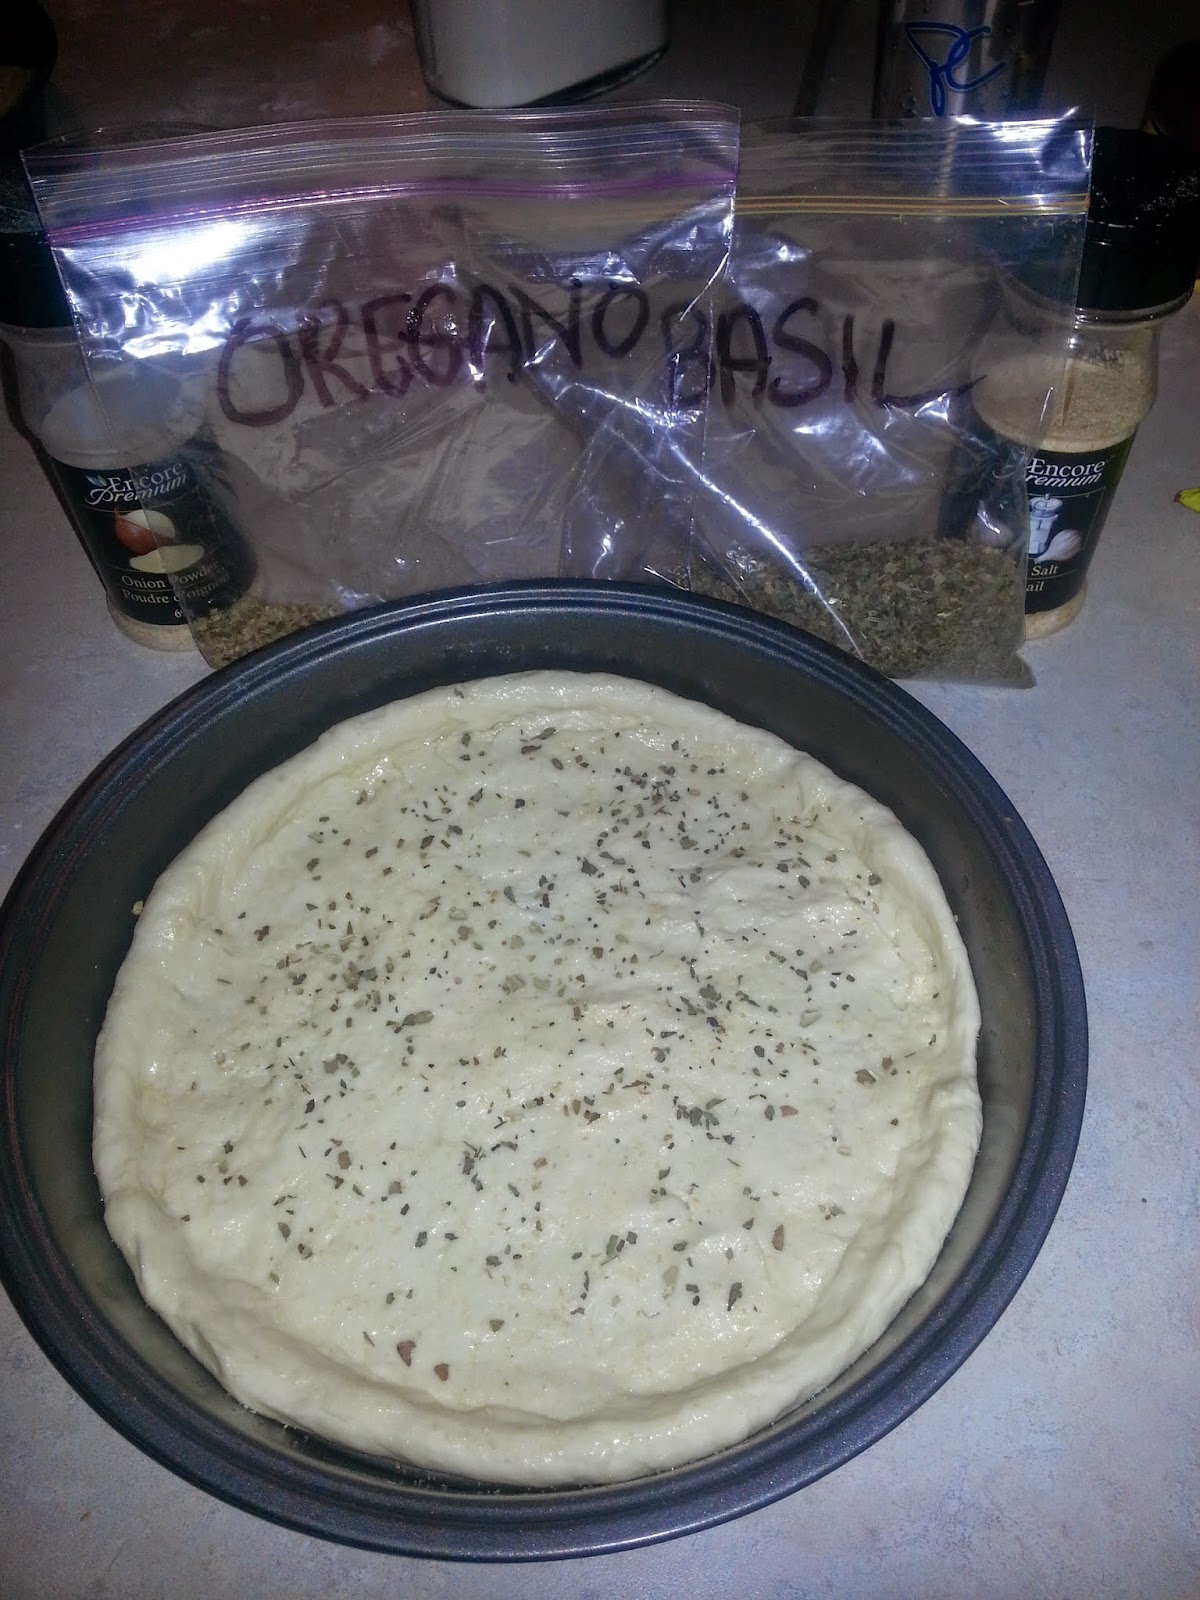
Adding some spices gives it that extra Italian flavour.

This dough is too sticky, it needs more flour.
This dough is perfect and ready to use.

When it comes to the spices you can use your own combinations you think would go well together. 
I like the taste of basil and oregano together with pizza. 
Some other options could be but are not limited to: 
garlic powder, onion powder, chili flakes, thyme, dried chives, chopped sun-dried tomatoes, 
cracked pepper, Italian seasoning, pretty much anything you think would taste good!


Once the dough has come out of the oven now you can add your toppings. 
I went with spicy pizza sauce, cheese, and pepperoni. 


Here are some of my families favourite topping combinations.

Alldressed - pepperoni, mushrooms, green peppers.
Veggies - green peppers, mushrooms, tomatoes, olives.
Italian -sausage, mushrooms, olives, fresh basil.
Buffalo Chicken - cooked chicken pieces, tomatoes, feta cheese, hot sauce.
Super Cheese - mozzarella, cheddar, parmesan, montery jack.

Some other topping ideas are:
spinach, black and/or green olives, onions, cooked bacon, cooked ham, pineapple, cooked ground beef,
garlic, hot peppers, sliced steak, and on and on and on!


Easy No-Yeast Pizza Dough
(makes two 9 inch pizzas)

2 1/2 cups of flour
2 1/2 tsp baking powder
1 tsp salt
1 tbs olive oil, plus more to drizzle over dough
1 cup of warm water, less or more depending on dough
1/2 tsp dried basil 
1/2 tsp dried oregano

1. Mix flour, baking powder, and salt together. 
2. Add the olive oil and warm water. If the dough is too sticky add more flour. If too stiff, more water.
3. Put dough on a surface covered with flour and knead for a couple of minutes. 
4. Grease a round cake or pie pan with some extra olive oil. 
5. Using you hands flatten the dough into a even circle, place into greased pan and stretch it the rest of the way to the edges and up a little to form a nice crust. Sprinkle with basil, oregano, and a little bit of olive oil.
6. Bake at 400f for about 25 minutes. 
7. Remove from oven then add your toppings. 
8. Bake another 5 minutes until cheese is all melty. Broil for a few more to make the cheese toasty brown.
9. Enjoy it with some extra warm pizza sauce on the side to dip it in!


Give it a try with your pizza lovers in your family! Get your kids involved by letting them help you knead the dough and flatten them out themselves. Then letting them top their very own pizza!


By Mommy Melissa

Tuesday, May 20, 2014

Spring is finally here!

Finally, it seemed like it would never get warm! I actually got a sun burnt today, and I usually don't burn! We spent the entire weekend outside, gardening and getting the patio ready for summer. I can't wait! Noah saw his very first worm today and toad, he was ecstatic about it. Here are just some picture we took over the weekend, Happy Victoria Day to all the Canadians :)


POST BY MOMMY OLIVIA

Wednesday, April 30, 2014

Have a BLAST with a DIY Minecraft party!

DIY MINECRAFT PARTY


My oldest son, Tristan, recently turned 8 (!!!). His choice for party theme this year was Minecraft, which I knew he would pick and I was probably more excited about than he was. If you're unfamiliar with the game, which can be played on XBox, PS3 and PC, I call it "virtual lego". You can build almost anything your heart desires, as well as mine for gold and diamonds. There are some "bad guys" but as far as video games go, they're fairly tame and the game is not gory at all.
 
 
I'll start with the invites.
 
 
I googled a few Minecraft pictures, downloaded the Minecraft font from here and used a program on my computer called PrintProjects to put everything together. I then printed everything on standard printer paper, cut each section out, and glued them onto green construction paper, which was then glued onto a slightly bigger rectangle of black construction paper.
 
Onto my favorite part: Décor!
 
I thought it would be a cool idea to make some real life Minecraft blocks for the kids to build with. Turns out, I was right, and the kids had a blast (heh, I'm so punny) building towers and forts, and pretending to be creepers and blow them up. The blocks were time consuming, but super simple. Just sturdy cardboard boxes painted with brown and green paint. I could have made them look pixel-ly like in the game, but I wanted to save a little time and the kids didn't even notice.
 
 
For the torches, I unfolded two cereal boxes and cut them to the size I wanted, leaving the flaps on. Then I folded them into the shape you see above, stuffed them with crumpled newspaper to make them a little sturdier, and taped them together. I covered them with paper and painted them as you see in the picture. All together, the blocks and torches took me about 8 hours from start to finish.
 
The rest of the décor was comprised of balloons, streamers, and paper.
 
 
For the spiders, I used black balloons and 4 long pieces of black streamer that I taped to the balloon in the middle to look like legs. I colored two squares of paper red and taped those onto the large end of the balloon (I would have used construction paper but I had no red and didn't want to make yet another trip to the dollar store) and tacked the whole thing to the ceiling, using tape for the ends of the legs.
 
The creeper balloons are just green balloons with a creeper face drawn on with sharpie marker. Easy peasy.
 
 
My Enderman! Same concept as the spiders. Black balloon, purple rectangles (again, I had to color these because I had no purple construction paper) and streamers for his arms and legs.
 
 
I got so many compliments on the goody bags. I sharpied creeper faces onto plain green paper bags from Party Max. The candy all represents items found in Minecraft:
 
Gold = Butterscotch candy
Diamonds = Clear mints
Melon = Gummy watermelon
Rocks = Chocolate covered raisins
Redstone = Sour cherry balls
Fish = Gummy fish
 
The kids really enjoyed being able to choose what they wanted to take home!
(The labels were not finished in this picture, but my daughter just wrote the names on squares of paper. I wanted to make signs with the actual Minecraft pictures of the items, but I forgot to email them to my husband so alas, it didn't happen. No one cared except me!)
 
 
Some more Minecraft snacks. Cookies, TNT (Twizzlers cut in half and wrapped with paper that I sharpied TNT onto), pretzel "Sticks", watermelon, and cracker "Fish". There's also a veggie tray just out of view because I wanted to get at least some healthy food in there somewhere. Our main course was pizza cut into squares (everything is square in Minecraft), pasta salad, potato salad (there are potatoes in Minecraft too!), and devilled eggs (eggs are also found in Minecraft, so I'm told).
 
 
The Brewing Station. Again, I wanted to make an official Minecraft sign and potion chart for this, but see reason above for the lack of it. I taped construction paper creeper labels around the water bottles, and made Kool-Aid syrup that I then poured into labelled squeeze bottles. The kids had a blast experimenting with different flavor combinations. The recipe for the syrups is as follows:
 
2 cups white sugar
1 cup water
1 pack Kool-Aid (I used cherry, strawberry, tropical, lemon-lime, and grape)
 
In a medium pot, combine sugar and water. Bring to a boil.
Boil for one minute, stir in Kool-Aid powder, and remove from heat.
Pour into heat-safe container and allow to cool. Once cool, pour into squeeze bottles.
 
The recipe made enough to fill each bottle twice for me. Depending on the size of bottles you use, you could end up with more or less.
 
 
And finally, my masterpiece! Chocolate cake with chocolate frosting, topped with marshmallow fondant and the red squares are fruit by the foot cut to size and stuck on by moistening the back with a tiny bit of water and pressing on gently. Here is the recipe and directions for the fondant:
 
2 cups miniature marshmallows
2 cups icing sugar
1 tbsp water
 
Place marshmallows and water in a microwave safe bowl. Microwave on high for one minute and stir well with a rubber spatula until no pieces of marshmallow remain. If you still see lumps, return to the microwave for another 30 seconds, repeating as necessary and stirring in between until the mixture is smooth.
Add icing sugar, stirring until mixture becomes stiff. You will likely still see some unincorporated sugar, that's fine. That will be incorporated in the next step.
 
Dust work surface with a good amount of icing sugar. This stuff is SUPER sticky. Pour/scrape mixture onto work surface, dust your hands with icing sugar, and knead until the fondant is no longer sticky and forms a smooth ball, adding icing sugar as needed. Be careful not to add too much or it will become difficult to roll out thinly.
Dust rolling pin with icing sugar, and roll out, turning fondant over and re-dusting surface with icing sugar frequently or it will stick and be a disaster. My test batch ended up stuck all over my kitchen counter because I didn't bother flipping or redusting. Not fun to clean.
When the fondant is rolled as thin as you like and big enough to cover your cake (I measured mine at 7" and added 2" for overhang). Use a pizza cutter or sharp paring knife to cut out your square.
Lift fondant (I used my rolling pin to drape it on so I didn't have to worry about tearing while I moved to where my cake was) and gently place on top of recently frosted cake (I frosted mine right before I started making the fondant). Smooth out the top and sides.
 
As I mentioned above, for the red squares I cut strawberry fruit by the foot into squares (for the big squares I cut two equal size pieces and used a dab of water to stick them together to form a square) and apply to cake by moistening the back of the squares and gently pressing onto fondant.
 
There you have it! I've never got so many compliments on a party as I did on this one, and it's probably one of the cheapest parties I've ever thrown, and by far the most fun!


Saturday, March 8, 2014

Fine Motor Skill Learning with Cheerios

Important skills for toddlers to learn are fine motor skills. It helps them with every day tasks as well as keeps their little minds learning. 


A fun idea for them is this cute and simple pipe cleaner and Cheerios craft. 
All you need is a pipe cleaner and a small plastic bowl full of Cheerios

Stale Cheerios all you have on hand? Perfect! This lets you use up them and not have to throw them away! 

All you have to do is give your child a bowl of Cheerios and the pipe cleaner.
Then show them how to put the pipe cleaner throw the hole of the Cheerio then let them try their hand at it themselves. 
Make sure that you encourage them to keep trying if they don't get the hang of it right away.
If they choose to snack on a few along the way, its not even a worry.


Logan was having a hard time with a full sized pipe cleaner as he wanted to hold it at the bottom. When he tried to thread the Cheerio, the pipe cleaner would bend. 
This was solved easily by cutting it in half. The half sized pipe cleaner worked even better for his little hands.


What are some other easy Fine Motor Skill ideas you know that use simple items? 


By Mommy Melissa
 photo 3mommiessig_zps86cc38de.jpg

Saturday, February 22, 2014

Kids Craft Idea - Shrinky-Dinks at Home!

Here is a simple and fast craft to do with your children this month. Its fast, simple and the best thing about it, your children get to use their art skills to come up with their own creative masterpieces.

Before they went into the oven
After they came out
The best pic I could get

All you need is:
#6 plastic (check out your recycle to see if you have any in there)
Permanent markers
Scissors
Cookie sheet covered in aluminum foil
Oven
Oven mitts


All you do is draw on the plastic with the markers then cut your design out as close as possible.
Preheat oven to 350.
Place on a cookie sheet coloured side up.
Put it into the oven for about 60 seconds. It may curl up a bit but once you take it out you can flatten it out with a knife in the first 10 seconds before it cools down and becomes solid.

You could even make jewelry this way. Just make a hole in the top before you bake them! 
What are some ideas you can think of to make with this craft idea?

By Mommy Melissa
 
 photo 3mommiessig_zps86cc38de.jpg

Sunday, February 16, 2014

Winter Bird Feeder DIY

Want to make a fun project with your kids this never ending winter? This has been an idea stuck in my head for a few weeks now and finally was put into works with my two lovely nieces. 

It is very simple but my two are too young for it. They like to put everything in their mouths. Bird seed and lard...not so yummy! They sat out this one. 

Mix up wild bird seed, raisins, peanut butter and lard in a bowl.

Use your hands if you want to get messy!

Push the mess, I mean mix into a disposable cup and let it harden in the freezer or outside if its very cold

Hang it in a tree and feed your new little bird friends!


DIY Winter Bird Feeder

Supplies
bag of wild bird seed
about 1 tbs peanut butter
a small handful of raisins
about a cup of lard, softened
disposable cup

Mix all the ingredients together then firmly press into the disposable cup.

Leave it to harden either in your freezer or outside if the weather is below freezing.

Once its solid, cut the cup along the side and remove it. 

You now can put it into a bird feeder you already have or simply cut two holes in the sides of a juice container or something along the same line, place the feed into it and hang from the tree.

Try it out if you want to attract some beautiful birds to your yard!

By Mommy Melissa
 photo 3mommiessig_zps86cc38de.jpg

Saturday, February 15, 2014

Salt Dough Hand Prints

Awhile back on the 3 Mommies Facebook Group, a member posted this picture.


Looked like a fun and easy project to do with my toddlers, my nieces and nephew. We did these awhile back in November so they would be able to give them to their parents for Christmas. I just had no computer to use to post at the time. So here they are now! In February! 

Here are some pictures of the fun time we had!


Give it a try!

By Mommy Melissa
 photo 3mommiessig_zps86cc38de.jpg